Last year, I used iWeb to build a cheap and cheerful website for my wife’s photography business (Amber Dawn Photography). Seeing as iWeb is slightly limited in some of the features you would expect in a professional site, I needed to make a few tweaks before I could be happy. Since then, we have had nearly as many requests for technical help as we have for real jobs. So many, in fact, I’ve decided to blog the steps I took to create the extra features that are in the site.
*EDIT* We are in the process of updating our site from iWeb to Drupal but for the meantime, the original iWeb site is in place. UPDATE: New site is up sans iWeb. I won’t be able to show you the different elements in action but everything below is still accurate and what I used for a number of years. Feel free to read on and let me know in the comments if you have any questions.
Before we get started, I should point out that although I have some design skills and limited HTML knowledge, I am not a web designer so I would not say that this is the best or only way to accomplish what I did…this is just some steps I figured out and they work for me.
(Note to iLife ’09 (or later) users. The version of iWeb included in the ’09 pack (and later versions, I assume) includes the ability to upload to your own server via iWeb’s FTP. Handy right? Actually, no. Not if you want to do any of these additions I am about to detail. To do any of these steps, you will need to publish to a local folder and then upload those files via your favourite FTP app).
Ok, lets get started! My goal was to create a site that would do several key things: display a flash slideshow of photos in a sexy way and provide the ability for people to submit requests or questions from the site itself via an online contact form, not just an email link. I also wanted control over the page titles (as opposed to the “file.html” name. Look up at the top of the browser to see what I mean) and last but not least, Analytics. iWeb didn’t actually do any of these in a way I was happy with.
1. The Flash Slideshow:
The lack of experience I have with Flash is embarrassing. I would have a better result if I threw a rock at my computer than trying to code some flash. So, naturally, I needed a program that would take my photos, arrange them the way I want and then disappear into a dark cubicle to create some code for me like a good little intern.

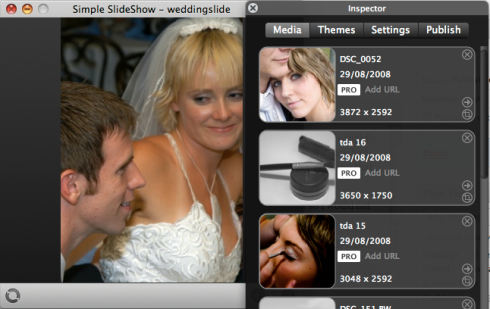
Aquafadas has done just that with their app, Bannerzest. It’ll cost you $50 (at the time of writing) to register which will remove the ugly watermark but trust me, it’s worth every cent!
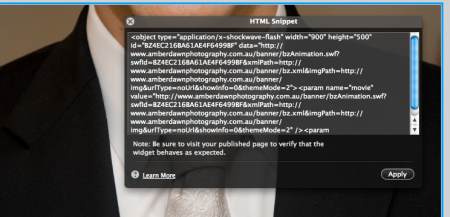
You arrange the slideshow to your liking, add whatever features you want and hit go. It will literally create a package ready to be added to your site. All you’ll need to do is copy some html code to your iWeb site using iWeb’s built-in ‘html snippet’ feature (shown below) and then upload the folder that Bannerzest just made. Couldn’t be easier!
(The way I did it, was to export to a local folder on my machine and then upload the folder manually. I needed to change some of the code that Bannerzest gave me to direct to the web and not my local folder).

2. Online Contact Form/page titles/statcounters
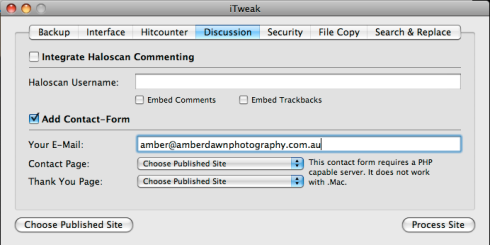
The online form took a little more effort and, depending on your needs, will require a little coding but Guimkie took a lot of the effort out with their handy app iTweak! This free app will actually handle most of the other tweaks you will need in iWeb including page titles, contact forms, statcounters and other stuff. You just select the changes you want and it can batch process everything at once if that’s what you’re into.
(Note on MobileMe: The trick for young players trying to create a contact form but are using MobileMe for your web server is that you are getting screwed right from the beginning. Most online forms (including this one) require a PHP-friendly server which MobileMe is not. So long story short, no contact form for you! You’ll need to find a real hosting server that can handle PHP.)

I followed the iTweak tutorial and it created a generic contact form with great results but I did need to adjust the coding to work for my site and I needed to add a few other fields. (If you are interested in getting my form’s code which includes fields for a name, email address, dates and extra info, just send me a message and I’ll email you).
To add Analytics to your site, you’ll need to register for free with a site like StatCounter. They will give you the code to paste into your site and you’ll need iTweak to do it as iWeb’s html snippet won’t work for this. This was seriously as easy as falling off a log so I won’t go into specifics. Alternatively, you can use a text edit app and literally copy the code in as per the instructions on Statcounter.
Correct Page Titles are simply a must for me and more often than not, I will name the file something easy to work with but will want to expand the page title in the browser. For this, you can use iTweak or any other html coding software (Dreamweaver, TextEdit, etc). iTweak‘s ‘Search and Replace feature is good because you won’t actually have to look at any html as it will do the work for you.
You’ll need to know the current title of your page (whatever you called it in iWeb) and then in the “Search” field within the ‘Search and Replace’ tab of iTweak, type in the title between <title></title> tags (eg,<title>currentpagetitle</title>). Do the same for the “Replace” field but this time, substitute the old title with your preferred one (EG,<title>newtitle – this page is awesome</title>).
Guimkie has some great tutorials on how to use their apps so I would suggest heading over to their site and reading through their stuff. They do great work.
I hope this has made sense for everyone. If all has worked properly, you should have a modified iWeb site with a flash slideshow, an online contact form, nice page titles and analytics to track your visitors. Of course, if you have more questions, if I’ve made a mistake or if you would just like to add some of your own iWeb tweaks, feel free to comment.
(While I wish I was, I am not receiving payment of any kind for recommending the above apps – I simply wanted to show what I used. If you are the developer of any of these apps and want to throw something my way, I’d be happy to receive it!)


